Introduction
The Snipping Tool is one of the most helpful screenshot tools available on Windows. Whether you want to capture your screen for work, save important information, or share something quickly, knowing how to use Snipping Tool makes everything easier.
It is simple, built-in, and perfect for everyday use. In this detailed guide, you will learn how to use Snipping Tool, its features, shortcuts, and useful tips.
What Is the Snipping Tool?
Before learning how to use Snipping Tool, it is helpful to know what it actually is. The Snipping Tool is a free screenshot application included with Windows.
It allows you to capture different parts of your screen in various shapes and styles. You can edit, highlight, and save screenshots easily—all without installing any extra software.
Why Learn How to Use Snipping Tool?
There are many reasons for learning how to use Snipping Tool, especially if you work on a computer regularly. Some benefits include:
- It is built-in and free
- Easy to use
- Offers multiple screenshot modes
- Allows simple editing
- Saves time
- Helpful for tutorials, notes, and professional work
Understanding how to use Snipping Tool can improve productivity and make daily computer tasks much simpler.
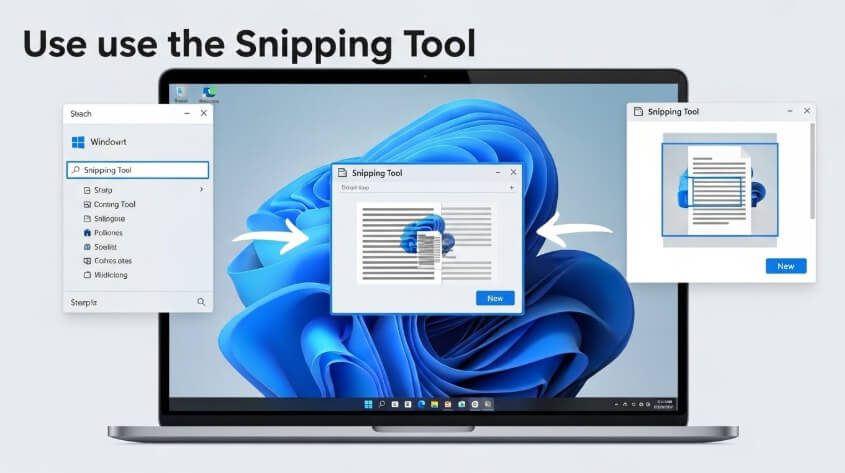
How to Open the Snipping Tool
The first step in learning how to use Snipping Tool is knowing how to open it. You can access it in several ways:
1. Using the Search Bar
- Click the Start Menu
- Type “Snipping Tool”
- Click the app to open
2. Using the Keyboard Shortcut
You can press Windows Key + Shift + S to open the snipping bar instantly.
This is one of the easiest ways to start taking screenshots when learning how to use Snipping Tool.
3. From the Start Menu Apps List
- Open Start Menu
- Scroll through the apps
- Find “Snipping Tool”
- Click to launch
How to Use Snipping Tool for Your First Screenshot
Learning how to use Snipping Tool starts with capturing your first screenshot. Follow these steps:
- Open the Snipping Tool
- Click “New”
- Choose the portion of the screen you want to capture
- Release the mouse to complete the screenshot
- The screenshot will open in the Snipping Tool editor
- Save, highlight, or copy the screenshot
That’s the basic process of how to use Snipping Tool.
How to Use Snipping Tool with the Shortcut (Windows + Shift + S)
One of the fastest ways to take a screenshot is by using the keyboard shortcut.
Here is how to use Snipping Tool with the shortcut:
- Press Windows + Shift + S
- The screen will dim
- A small toolbar will appear at the top
- Select your preferred snip type
- Take your screenshot
- It will be copied to the clipboard
- You can paste it directly into documents, chat apps, or image editors
This method is great when you want quick screenshots without opening the full app.
How to Edit Screenshots in the Snipping Tool
Editing is an important part of learning how to use Snipping Tool. After taking a screenshot, it opens in the editor where you can:
- Highlight text
- Draw using a pen or pencil
- Erase marks
- Crop the screenshot
- Save in different formats
These editing tools help make your screenshots professional and easy to understand.
How to Save Screenshots in the Snipping Tool
Saving is simple and an essential part of how to use Snipping Tool. Follow these steps:
- After taking a screenshot, click the Save icon
- Choose a location
- Name your file
- Select format (PNG, JPG, or GIF)
- Click Save
PNG format is usually recommended because it keeps the image clear.
How to Use Snipping Tool for Delayed Screenshots
The Snipping Tool also allows delayed captures. This is useful when you want to open menus or hover effects before taking the screenshot.
Here’s how to use Snipping Tool with delay:
- Open Snipping Tool
- Click the “Delay” option
- Choose 3, 5, or 10 seconds
- Click “New”
- The timer starts
- Prepare your screen
- The tool captures when the timer ends
This feature is especially helpful for tutorials or software demonstrations.
How to Use Snipping Tool for Copying and Sharing Screenshots
Sharing screenshots becomes easy once you know how to use Snipping Tool. After capturing:
- Click the copy icon to copy to clipboard
- Paste into emails, chats, or documents
- Directly share through apps if supported
This saves time and makes communication faster.
How to Use Snipping Tool on Touchscreen Devices
If you are using a touchscreen laptop or tablet, here is how to use Snipping Tool:
- Open the tool
- Tap “New”
- Use your finger or stylus to select the area
- Edit with touch tools
- Save the screenshot
The Snipping Tool works smoothly on touchscreens, making it even more convenient.
Conclusion:
Learning how to use Snipping Tool is important for anyone who works on a Windows computer. It is simple, free, and full of helpful features.
Whether you are capturing a small area, a full window, or your entire screen, the Snipping Tool makes the process quick and smooth.
With the tips and steps in this guide, you can now confidently use the tool for work, school, or personal tasks.
If you want an easy, fast, and reliable way to take screenshots, mastering how to use Snipping Tool is the best place to start.